Setting a custom theme programmatically in Magento Commerce 2.
Magento is a powerful framework, but sometimes it isn’t the easiest to figure out. As someone new to Magento 2 development, I find myself relying on the online community to learn how to do the things I need for my job. I recently wanted to find a way to change my site’s theme to my custom theme. I found many tutorials on how to do so through the admin panel, but I wanted a way to make this change programmatically. That way new instances I install would have my new theme as the default, and I would not need to manually change it every time. As I could not find those instructions online, I humbly offer my findings here. Hopefully it will help someone!
This walkthrough assumes you have a custom theme and know the theme_id. My theme_id in this case was 4. You can find that information in the ‘theme’ table in the database.
I started out by going into the admin panel, and changing the theme to my existing theme. I found that in the database that change is reflected in the ‘core_config_data’ table, adding this line:
|
config_id |
scope |
scope_id |
path |
value |
|
6 |
default |
0 |
design/theme/theme_id |
4 |
Armed with this information I went about trying to duplicate this change in the code. The best way I could think of to update database information is through an InstallData or UpgradeData script.
I found a good example in the vendor/magento/module-catalog/setup/InstallData.php
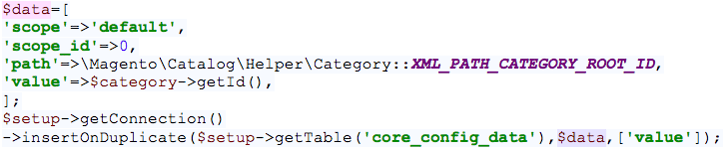
So I duplicated that technique in \app\code\{VENDOR}\Setup\Setup\UpgradeData.php
(This is just my first attempt, scroll to the bottom for the finished code!)
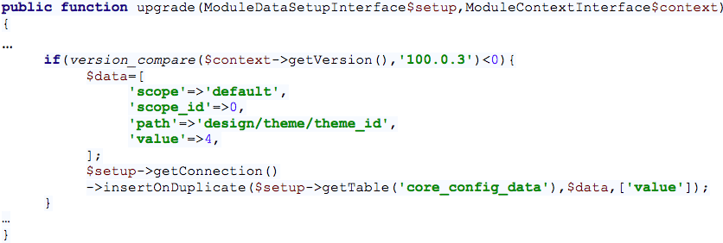
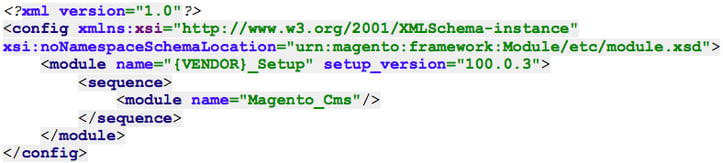
Where my previous version was 100.0.2 (you can actually check your current version in the setup_module table, my module name was {Vendor}_Setup). Next I bumped up my setup_version number to 100.0.3 in app\code\{VENDOR}\Setup\etc\module.xml
To test this I ran the command ‘magento setup:upgrade’. I found that it added the line to the database, but it did not make the changes necessary to have my selection show up in the admin page. It is also generally bad practice to directly modify the SQL, so I wanted to find a better way. (Note, I then reset my schema_version and data_version in the setup_module table back to 100.0.2).
Through further investigation I discovered that changes are made in the ‘design_config_grid_flat’ table in order to show up on the admin page. Through debugging I found where those changes are made, in \vendor\magento\module-theme\Model\DesignConfigRepository.php

And because reindexGrid is protected, the internals here:

With this information I crafted the final version of the Upgrade script. Again in \app\code\{VENDOR}\Setup\Setup\UpgradeData.php:
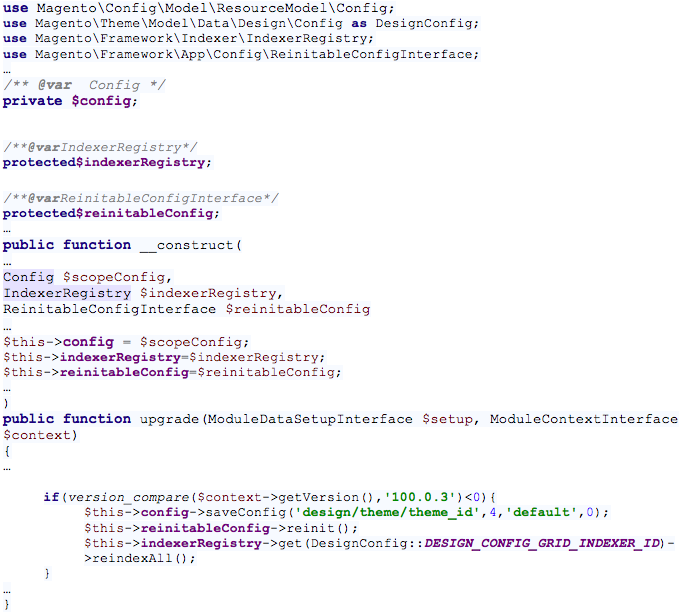
I finally ran the command ‘magento setup:upgrade’
If the dependency injection is done correctly and the proper version and theme id specified, this update script should programmatically alter the theme! I hope this walkthrough has helped you and may serve as a jumping off point for future explorations into the Magento codebase. Happy coding!
Do you have a Magento 2 project that needs assistance, or have a Magento 2 question for our certified developers? Contact our team.